Act: Executing the Right Work at the Right Time
 We’re
set, we know what work we need to do and aligned it to our goals. We know when we’re going to do the work, now
all we need to do is:
We’re
set, we know what work we need to do and aligned it to our goals. We know when we’re going to do the work, now
all we need to do is:
DO IT
Topics
Time an Action
Record Time
Record Mileage
Delegate an Incoming Email
Delegate a Task
Set a Reminder (Email)
Set a Reminder (Contact)
Task Pane Shortcuts
Time an Action
Time blocking is absolutely
the right thing to do, and it works well to protect your calendar for blocks of
time that are spent on tasks that need to be done in a specific timeframe. But I think we can do better!
Consider blocking time to work
on a deliverable for a client, e.g. preparing a brief or working on a specific
software feature. I like to block time
for deliverables; however, a deliverable is not a task. Deliverables are often broken down into
several tasks, all of which have been estimated to come up with a communicated
commitment for the deliverable.
Wouldn’t it be good to track time working on an estimated
task to make sure you’re delivering in the timeframes quoted?
On the Task ribbon menu and in the Task context menu, we’ve added a “Start Task” button.
 Task Ribbon Menu
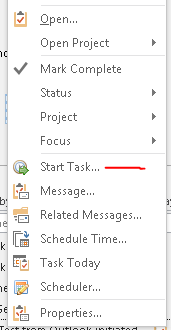
Task Context Menu
When a task is ‘started’ the Mini-Task windows is presented:
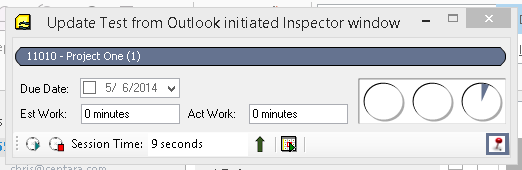
Mini-Task- Elapsed Time Mode (Counting Up)
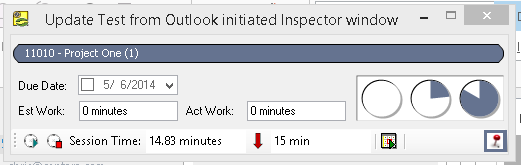
Mini-Task- Countdown Mode (Counting Down)
Record Time
The mini-task will keep a timer running for as long as you are working on the task. If you want to work on something else or react to an interruption, you can stop the timer and then resume when you get back to working on the task. When you’re done, select the ‘Stop’ button (bottom bar) and record the time onto the calendar using the ‘Appointment Record’ button. If you forget and close the mini-task, it will prompt you to save the task and/or create an appointment.
If in “countdown” mode, the timer will show a Message Box when the timer has exhausted the countdown time (as expressed in the textbox on the right in the bottom toolbar).
The mini-task can be set to always stay on top of all open windows by selecting or de-selecting the Pin “Always on Top” button
Appointment Categorization
In order to track the time we spend doing the work; as we check off the tasks, attend the meetings, and collaborate with people, we will need to record an appointment for the work, and categorize the appointment so that the Timecard function knows how to calculate the time spent per project.
If you create an appointment by dragging a task into your calendar the project categorization will occur with no extra effort. However, if you create an appointment through a Calendar event (Appointment object) or accept a meeting invite, you will need to categorize the appointment to a project.
An appointment can be categorized in a number of ways, 1) open the appointment and select the project via the FocusMe ribbon menu, 2) right click on the appointment in the Calendar view and use the Categorize context menu, or 3) use the Explorer FocusMe ribbon buttons when viewing the Calendar and have an appointment selected.

Appointment Ribbon Menu

Explorer Appointment Ribbon Menu
Mileage Tracking
In addition to using appointments for keeping a record of where time gets spent, if you have the need to track how far you’ve traveled, an appointment item is a good mechanism for tracking your distance. For example, a consultant may have multiple clients in different locations. Since traveling to the client is considered a business expense, tracking distance traveled would be beneficial come tax time.
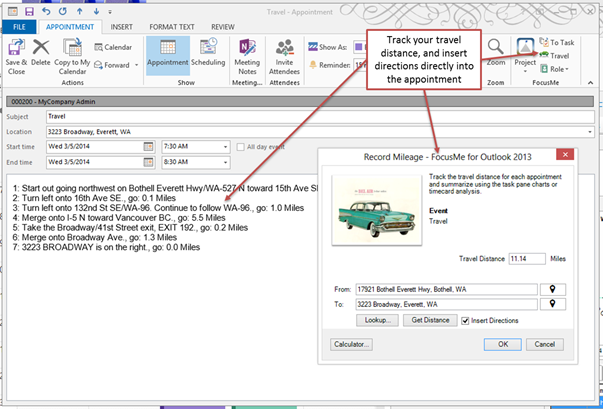
Appointment FocusMe Travel Button
The application tracks the distance in either miles or kilometers (set via the Options dialog), and presents the information via the Mileage Pie Chart or through the Timecard function. You can record the distance traveled using the ‘Travel’ button.
The Record Mileage dialog remembers the last 10 addresses – selected via the PIN button to the right of the address textbox. If the ‘Insert Directions’ checkbox is checked, after the OK button is selected, the directions will be inserted into the body of the appointment.
Delegation
The FocusMe application supports three main collaboration approaches; 1) via email, 2) using FocusSync, and 3) using Microsoft SharePoint. You must have a Sharing license to access the FocusSync and SharePoint methods.
Delegate an Email
If you’re a project manager or have people accountable to you, delegating tasks is a useful tactic and a leadership skill. However, delegating an email can get lost if the person to whom the action is being delegated forgets to do it or doesn’t respond. The FocusMe tool helps with delegation by adding a ‘Task Request’ toggle button to an outgoing email when delegating using Email. Delegation can also be done using FocusSync and SharePoint (which is covered later).
Delegate using Email
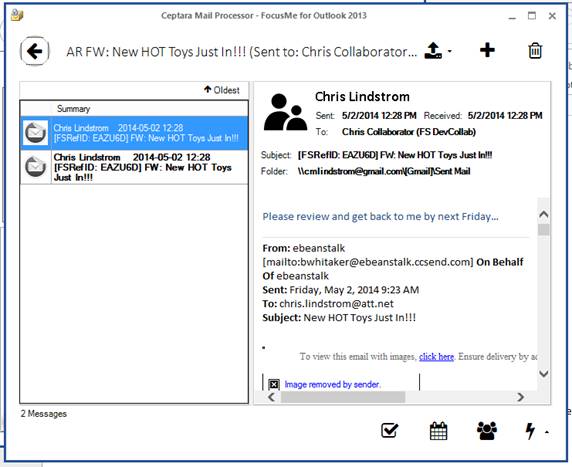
As you’re reading a new email and find that you want to delegate an action, select the Delegate button on the incoming email ribbon menu:
Incoming Email Ribbon Menu
A ‘forwarded’ email will be created with the ‘Task Request’ button set:
Outgoing Email Ribbon Menu
The sent email will have its subject augmented with an FSRefID code that corresponds to a new task that was created after the ‘Send’ button is pressed. Every subsequent email will maintain the subject tag, making it easy to track the conversation regarding that task. The person on the “To:” line of the outgoing email will be linked to the new task and if a project is assigned to the email, that person will also be automatically associated with the project (showing up on the Contacts or Team tab on the Open Project window: right-click on a project in the Task Pane to open a project).
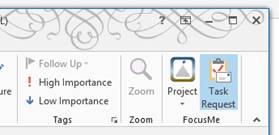
Contact Information
If you want to know what that person is working on as it relates to your requests and emails open their contact record and select the “Info” button:

Contact Ribbon Menu
Or you can right-click on their record in an open Project, or their contact record in an Outlook view or click on their email address in an email – the Info dialog is presented:
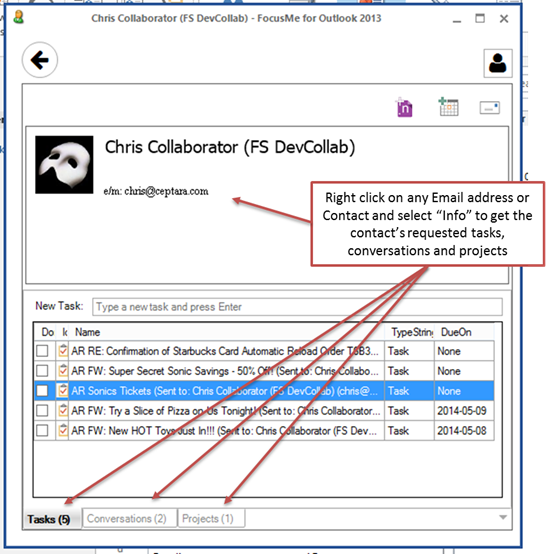
Contact Info Window and Control
And if you want to review the conversation for any delegated task, simply open the task and select “Related Messages” or right-click on the Task and select that same button.
Mail Processor
Set a Reminder (from an Email)
When responding to an email or sending a new email, we may want to remind ourselves to follow-up on a certain day with another email, or perhaps a phone call. This can be especially true when we’re requesting action from someone other than a team member, or someone who might not respond well to a ‘Task Request’ such as a customer.
In FocusMe, we accomplish that by setting the Follow-up flag on an outgoing email and then the tool automatically creates a ‘tracking task’ linked to the email and to the recipient.
Send a Follow-up flagged email
When composing an email set the Follow-Up flag in the ribbon menu:
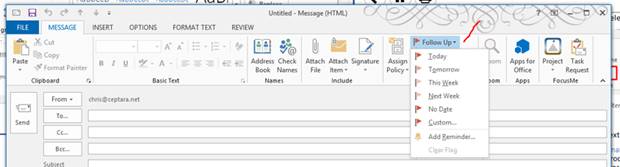
Setting Follow Up flag
using Exchange
When using Exchange, Office365, or an Exchange like service, the user gets a number of choices for when to follow up. When using an IMAP connection to the email service, there is only one choice.
Once the email is sent, the tool will clear the Follow-up flag (which is usually set on the outgoing email in the ‘Sent Items’ folder) and create a tracking task. You can see all tracking tasks associated with a specific individual by opening the Contact Information dialog.
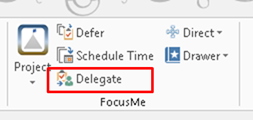
Delegate a Task
When we’re planning a project, we lay out the milestones, deliverables and tasks, i.e. the Work Breakdown Structure (WBS). Then we go to work identifying who we need to do each task.
We start the delegate action by using the ‘Delegate’ button on the Task ribbon or using the ‘Delegate’ menu item on the right click context menu for a task.

Task Ribbon Menu
There are three different tracking mechanisms in FocusMe for managing task delegation; 1) Email, 2) FocusSync service, and 3) SharePoint.
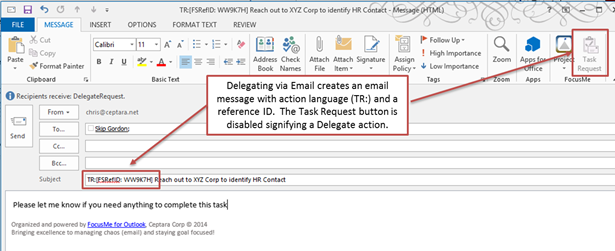
Delegate a Task using Email
A new email is created with action language, e.g. TR: (set via the Options dialog) and a reference ID. The reference ID is used to track the task and conversations regarding the task. Use the Message button on the Task ribbon to start a conversation regarding the task (this will automatically insert the reference ID into the outgoing email message’s subject). Use the ‘Related Messages’ button to gather and present all conversations regarding the task.
Delegate a Task using FocusSync
Work is in progress.
Delegate a Task using SharePoint
Work is in progress.
Set a Reminder (regarding a Contact)
We may need to remind ourselves to do an action regarding an individual, e.g. call the person, send them a report (once it’s finished), or follow up with them sometime in the future. You can set a reminder task by selecting the “Set Reminder” button on the Contact’s ribbon menu or using the Contact Information dialog. A new task is presented that can be edited and saved. Once saved, the new task will show up in the contact’s task list via the information dialog.
Select the “Set Reminder” button from Outlook’s contact ribbon:

Contact Ribbon Menu
Or the “Set Reminder” button on the Contacts Information dialog.
FocusMe Contact Information Dialog
Using the “Set Reminder” button is different than delegating
a task to the person. A reminder is for
you to do something, a task request is asking that person to do something and
then let you know that they did it.
Task Pane Shortcuts
In Outlook, there are a number of shortcuts that can be used to create a new task, appointment, note, and email. Unfortunately, you must have Outlook open and in focus for the shortcuts to be useful. One key feature of the undocked task pane is that is can be always visible and placed on the desktop to manage and monitor the completion of your work. We’ve added the Outlook shortcuts to the undocked task pane so that whenever needed, you can create a new task (Ctrl-Shift-K) or new appointment (Ctrl-Shift-A) from the task pane.
Click on the undocked task pane and select any of these key combinations:
|
Keys
Pressed |
Result
|
|
Control-Shift-A |
Create a new appointment |
|
Control-Shift-C |
Create a new contact |
|
Control-Shift-K |
Create a new task |
|
Control-Shift-M |
Create a new email message |
|
Control-Shift-N |
Create a new note – if a connection to OneNote is enabled (via the Options dialog), a new OneNote note is created, otherwise, an Outlook note is created. |
|
Control-Shift-Q |
Create a new meeting request |
Copyright (c) Ceptara Corp.